When preparing your product for AI-generated videos, high-quality visuals are non-negotiable. Poor images can lead to distorted videos, undermining trust and conversions. This guide outlines a five-step checklist to ensure your product is ready for professional video production, saving costs and protecting your brand.
Key Takeaways:
- Visual Quality: Use images with at least 2,000 pixels on the longest side and videos at 1080p resolution. Stick to clean, well-lit shots with neutral backgrounds.
- Brand Consistency: Organize a brand kit with logos, colors, and fonts. Use sRGB color space to avoid mismatched colors.
- AI Testing: Tools like PyxelJam can help refine visuals. Test short clips before full production to ensure consistency.
- Technical Setup: Use MP4 format with proper aspect ratios (e.g., 9:16 for TikTok). Organize assets with descriptive names and maintain quality control.
- Final Checks: Test videos on multiple devices, ensure visuals tell a story even without sound, and review for any distortions or glitches.
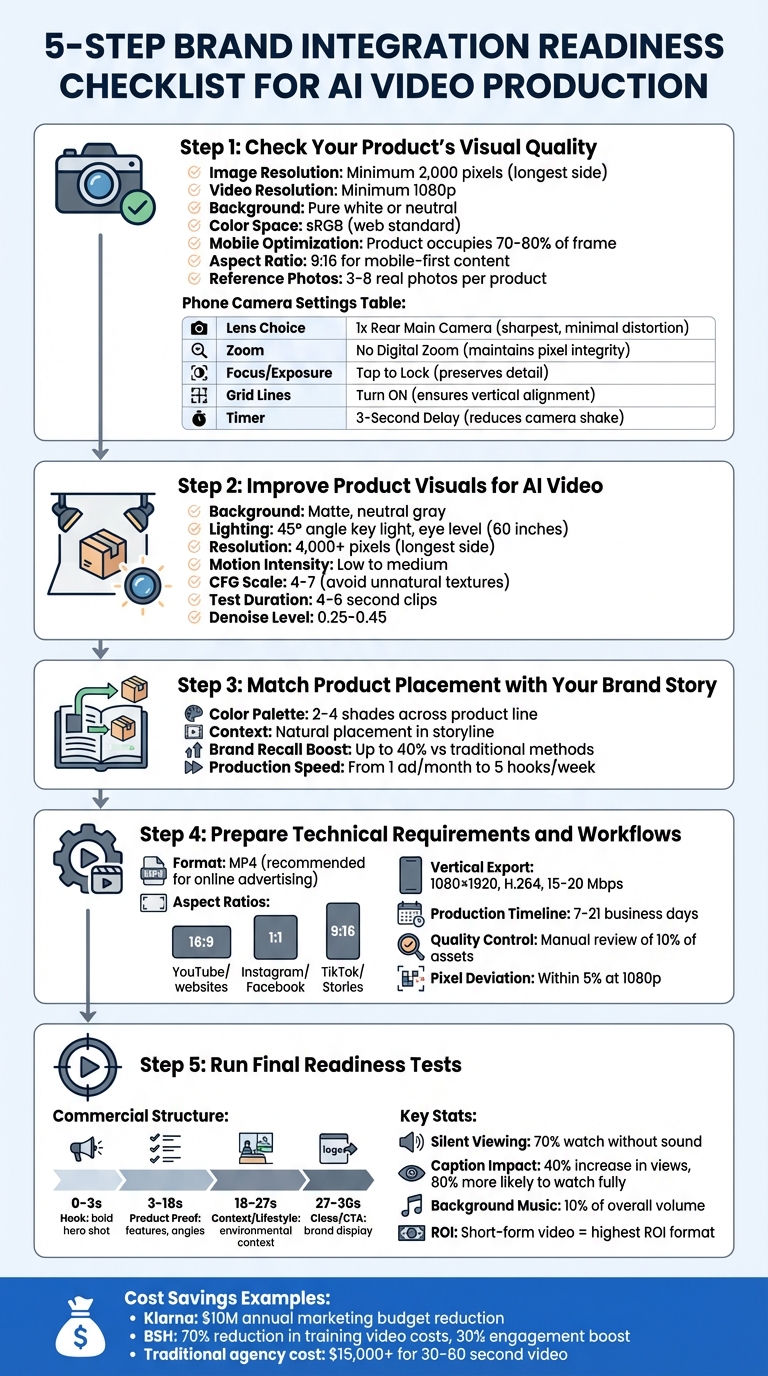
5-Step Brand Integration Readiness Checklist for AI Video Production
Make the Most Realistic AI Videos Possible (Step-by-Step Tutorial)
sbb-itb-0df1f49
Step 1: Check Your Product’s Visual Quality
When working with AI video tools, your product visuals need to go beyond "good enough." They must meet technical standards to avoid issues like distortion, warping, or errors that could harm your brand’s image.
Review Image and Render Quality
Start with the essentials: resolution, lighting, and background. Your images should have at least 2,000 pixels on the longest side for clear AI video rendering. For video, aim for a minimum resolution of 1080p.
Use soft or natural lighting to avoid harsh shadows and ensure the product looks grounded in its setting. Stick to a pure white or neutral background for product shots – this helps AI tools isolate your product cleanly and integrate it into different scenes. Pay attention to details: glossy surfaces should be spotless, and labels, caps, or lids should be perfectly aligned.
"The product is the hero. Everything else exists to support it. If a prop competes for attention, remove it." – Jessica Mercedes
When using a phone camera, select the 1x rear main lens instead of the selfie or ultra-wide lens to minimize distortion. Physically move the camera closer instead of relying on digital zoom, and avoid portrait mode to preserve edge clarity. Turn on grid lines to ensure items like bottles and boxes are straight, and use a 3-second timer to prevent camera shake. If you’re shooting indoors, turn off extra room lights to avoid inconsistent color temperatures.
| Phone Camera Setting | Recommended Action | Why it Matters for AI Video |
|---|---|---|
| Lens Choice | 1x Rear Main Camera | Sharpest lens with minimal distortion |
| Zoom | No Digital Zoom | Maintains pixel integrity during movement |
| Focus/Exposure | Tap to Lock | Preserves label and texture detail for close-ups |
| Grid Lines | Turn ON | Ensures products are perfectly vertical |
| Timer | 3-Second Delay | Reduces camera shake for crisp images |
Confirm Brand Alignment
Your visuals should closely reflect your brand’s identity. A well-organized brand kit is essential – it should include logo files (in SVG or AI formats), HEX or RGB color codes, typefaces, and spacing guidelines. Save all images in the sRGB color space, which is the web standard, to prevent color mismatches between the digital visuals and the actual product. This is crucial, as one of the top reasons for e-commerce returns is color variations between what customers see online and what they receive.
Document key product details to create a "truth set." This should include exact dimensions, materials, finishes, and any fixed elements like logo placement or label text. Research shows that consistent branding builds consumer trust and directly correlates with higher revenue.
Review Your Existing Assets
Audit your current product image library to ensure it’s AI-ready. Each product should have a reference set of 3–8 real photos, showing different angles like front, back, side, close-ups, and packaging. For mobile optimization, make sure the product occupies 70–80% of the frame, keeping it prominent on smaller screens. Since mobile devices account for over 70% of social ad conversions, using a 9:16 aspect ratio is ideal for mobile-first content.
Rename your image files to be descriptive and keyword-rich. For example, change a generic name like DSC001.jpg to something like organic-cotton-yoga-mat.jpg. This improves search engine visibility. Also, inspect your visuals for any "AI lies" – mistakes like warped shapes, misspelled text on labels, or incorrect reflections. AI often struggles with materials like metallics and glass, so double-check these areas to ensure they look natural and accurate in the final video.
Step 2: Improve Product Visuals for AI Video
After auditing your assets, it’s time to refine those visuals to meet the specific needs of AI video production. Quality inputs are essential for smooth and accurate AI-generated results.
Refine Product Design Elements
Switching to a matte, neutral gray background can make a big difference. Unlike a pure white backdrop, this setup reduces blown-out edges and helps the AI clearly define where your product ends and the scene begins.
Lighting is another key factor. Position a key light at a 45° angle to mimic natural light. This approach creates dynamic shadows and highlights, which help the AI interpret the scene better compared to flat, uniform lighting. For the best perspective, shoot at eye level (around 60 inches) and avoid wide-angle lenses, which can distort proportions.
Surface finishes also matter. Matte surfaces photograph cleanly and convey a sense of sophistication, while reflective or wrinkled materials can confuse AI models or make your product look less polished. Aim for images with a resolution of at least 4,000 pixels on the longest side to ensure fine details are preserved during processing.
"The quality is determined by the raw materials – the ingredients – you feed into it before the generation button is ever pressed."
- Eugene Vyborov, AI Implementation Expert
For animations, keep motion intensity low to medium. Rapid zooms or pans can cause product distortions or temporal inconsistencies. Normalize your lighting setup to prevent harsh shadows that might flicker in the final video. When configuring AI generation settings, use a Classifier-Free Guidance (CFG) scale of 4 to 7. Going too high can result in unnatural textures, like plastic-looking skin or overly sharp lighting.
Test with PyxelJam
Before diving into full production, use PyxelJam to test your product visuals in short AI-generated clips. Start with 4–6 second videos to evaluate temporal consistency, as AI models often struggle with maintaining structural integrity during fast motion or extended durations.
A 2×2 grid generation method can help you lock in consistent lighting and style across multiple variations of the same scene. This ensures that different cuts or angles align visually. To double-check consistency, arrange static frames in Figma to confirm that lighting and branding elements stay uniform.
A great example of this workflow in action comes from January 2026, when PJ Ace created an AI-generated ad for the health brand IM8 featuring David Beckham. By leveraging character reference sheets and depth maps, the campaign reached 233 million views in just three days. Tools like ChatGPT, Ideogram, and Figma played a role in this streamlined "ingredients-to-video" process, which was far more cost-effective than traditional production methods.
When testing, use negative prompts to avoid common AI issues like distorted anatomy, extra fingers, or glitches in text overlays. To maintain your product’s identity across frames, use a fixed seed value and set the denoise level between 0.25 and 0.45. This helps preserve your product’s appearance and integrity.
"AI video production flips that into script → prompt → generate → light edit. You move from ‘we might get one ad this month’ to ‘we can test five hooks by Friday’."
- Emma, AI Growth Adviser, Zeely
Once you’ve achieved successful test results, standardize these settings for consistent output in future projects.
Create Consistent Visual Standards
Establishing clear visual standards ensures that every AI-generated video aligns with your brand identity. This involves more than traditional brand guidelines – it’s about translating your brand’s visual language into specific AI parameters. Define details like on-screen talent, wardrobe colors, set designs, and camera angles that reflect your brand.
Stick to a color palette of 2–4 shades across your product line to maintain visual harmony between video frames. Provide PyxelJam with a curated library of approved product images, brand colors, and reference visuals so the AI can better replicate and extend your brand’s unique style.
For technical consistency, specify export settings tailored to your target platforms. For example, use a 1080×1920 resolution (9:16 aspect ratio) with H.264 encoding and a bitrate of 15–20 Mbps for platforms like TikTok or Meta. This ensures that fine details, like micro-textures, remain clear – especially important since mobile views drive over 70% of social ad conversions.
Companies like Klarna and BSH have already seen major cost savings and efficiency gains by adopting AI tools. Klarna cut $10 million annually from its marketing budget, while BSH reduced training video production costs by 70% and boosted viewer engagement by 30%.
Finally, set up a compliance checklist to catch issues like off-brand details, distorted visuals, or glitchy text that could harm your brand’s reputation. Human review is essential to ensure every AI output meets your editorial standards. While AI can speed up production, it should complement – not replace – human oversight. AI is a tool, not a substitute for creative judgment.
Step 3: Match Product Placement with Your Brand Story
Once your visuals are polished, the next step is to seamlessly integrate your product into the video’s narrative. The goal here isn’t to flood every frame with your product but to strategically position it in a way that supports your brand message and feels natural to the audience.
Fit Products into the Story
Context is everything when it comes to effective product placement. Your product should appear in moments where it naturally fits within the storyline. For instance, a coffee mug fits perfectly in a morning routine scene, but it would feel out of place during an intense evening discussion. Tools like Natural Language Processing (NLP) can help analyze video dialogue to identify the best moments for subtle yet impactful product placement.
Take the example of PJ Ace’s 2026 campaign, which proved that careful planning can achieve results comparable to big-budget productions. Their structured workflows and use of detailed character reference sheets led to a staggering 233 million views in just three days.
"AI video creation is not a ‘text-to-video’ process… It is a complex orchestration of assets, reference images, and motion control tools."
- PJ Ace, AI Creative Director
While planning your video, focus on the core promise of your product – like "running shoes that feel light." Then, use camera techniques that emphasize this message. For example, slow push-ins can highlight luxury products, while dynamic, fast-paced shots work well for athletic gear. The key is to align your camera movements with your brand’s personality rather than just the product category.
This approach helps ensure that the placement feels natural and reinforces your message visually.
Keep Brand Elements Consistent
Once your product is contextually placed, the next step is to maintain a cohesive visual identity. Platforms like PyxelJam can help lock in your logos, color palette, and typography across all AI-generated content. By providing the platform with a curated library of approved brand assets – such as product images, HEX or RGB color codes, and reference visuals – you enable the AI to replicate your brand’s specific aesthetic.
To ensure visual continuity, test your scenes in tools like PyxelJam and arrange key frames in a design tool like Figma before committing to full video rendering.
A great example of this approach comes from Kalshi’s 2024 AI-driven NBA Finals ad. Described as a "love letter to Florida", the campaign used locally relevant archetypes – like “Miami Club old man” and “swamp characters” – to resonate with the regional audience. At the same time, the production team maintained consistent branding throughout the ad.
Customize for Your Audience
Once your brand elements are consistent, focus on tailoring your message to different audience segments. While different groups may respond to varying tones or styles, your core brand identity should remain intact. AI-powered video creation makes this process faster and more efficient. You can quickly test multiple variations – adjusting tone, pacing, or references – without compromising on your brand’s visuals or message. This flexibility allows brands to move from creating a single ad in a month to testing five different hooks in just a few days.
Using a storyboard to guide these variations ensures that your content aligns with both your brand strategy and your audience’s preferences. While the AI handles the technical aspects, this human-led direction ensures the final product resonates on a deeper level. When done right, AI-driven advertising can boost brand recall by up to 40% compared to traditional methods, provided the product placement feels natural and the brand story remains intact.
Step 4: Prepare Technical Requirements and Workflows
Once your product aligns with your brand story, it’s time to establish a solid technical foundation. This step ensures smooth production by organizing files, verifying platform needs, and setting up checkpoints to catch issues early.
While visual quality and brand alignment are crucial, a well-prepared technical setup is just as important for creating error-free AI videos.
Check Technical Requirements
First, confirm that your product assets are compatible with PyxelJam. The platform supports various types of assets – like footage, graphics, and logos – but they must be submitted in the correct formats. For final video delivery, standard formats include MP4, MOV, AVI, and WebM. Among these, MP4 is the go-to choice for online advertising because it balances high quality with smaller file sizes and works seamlessly across most platforms.
"For online advertising, MP4 is the most widely used due to its compatibility, high quality and small file size." – PyxelJam
Choose the right aspect ratios for your content: 16:9 for YouTube and websites, 1:1 for Instagram and Facebook, and 9:16 for TikTok and Stories. For vertical content, export at 1080×1920 resolution using H.264 encoding with a bitrate of 15–20 Mbps. Starting with the correct format saves you from reformatting later and preserves quality.
These technical details are key to ensuring your visuals look flawless in the final output.
Organize Your Assets
Efficient file organization can prevent unnecessary delays. Make sure all production-ready images and assets have descriptive file names, making them easy to locate during the "launch and measure" phase.
Treat your seed values like critical brand assets. These numbers maintain consistency in your product’s structure and appearance across different shots and tools. Additionally, create a centralized library of prompt snippets that include your brand colors (in HEX or RGB), typography guidelines, and logo specifications. This library will help ensure that all AI-generated variants remain visually consistent.
Tools like Figma can help you arrange key frames, allowing you to perform technical consistency checks before the final rendering process begins.
Proper organization not only streamlines production but also guarantees consistency across your content.
Set Up Quality Control Steps
With your assets in place, it’s time to implement quality control measures to maintain high production standards. These steps build on the creative and visual groundwork you’ve already laid.
Establish checkpoints in your workflow to enforce standards. Follow a structured production sequence: product cleanup → scene generation → motion generation → voiceover → edit → export. This linear approach minimizes the risk of costly re-rendering.
Pay close attention to AI-specific issues, such as distorted logos, warped product features, or flickering backgrounds. Use a 50% opacity overlay to compare new assets with the original reference, ensuring key product features align within a 5% pixel deviation in 1080p resolution. High-performing teams often manually review at least 10% of approved assets to ensure they meet aesthetic criteria.
Production timelines usually range from 7 to 21 business days, starting from concept to the final delivery. To avoid delays, submit all graphics, logos, and footage upfront. Keep in mind that major changes later in the process may require additional time. PyxelJam’s real-time communication system allows you to review drafts and provide feedback throughout the production process, from the first version to the final product.
Step 5: Run Final Readiness Tests
With your assets polished and workflow fine-tuned, it’s time to ensure everything meets the highest production standards through a final round of testing.
Create Test Videos
Produce test videos using PyxelJam and your prepared assets. Start small – 10-second clips are ideal for testing and can be combined later into longer commercials. Experiment with different creative presets to find the lighting and pacing that best align with your brand’s tone and emotion.
Pay close attention to how your product looks in each clip. Consistent lighting is critical for showcasing textures, shapes, and finishes. For reflective surfaces like glass or metal, control the lighting to avoid harsh highlights or distracting reflections.
"The product is always the hero, framed clearly and confidently." – Invideo
Stick to a proven commercial structure: start with a hook (0–3 seconds), then highlight product features (3–18 seconds), provide lifestyle context (18–27 seconds), and finish with a clear call-to-action (27–30 seconds). The hook should immediately grab attention with a bold, well-framed hero shot. After testing, review each clip thoroughly to ensure it meets these standards.
Compare Results to Checklist
Evaluate your test videos against a detailed quality checklist. Look for any inconsistencies in product shape, texture, or logo placement between shots. Confirm that colors, textures, and fine details remain intact. Each clip should focus on a single, clear idea, with the product centered against a simple background. Logos and small text must stay readable, even during transitions.
| Commercial Stage | Timing | Review Focus |
|---|---|---|
| Hook | 0–3 sec | Bold hero shot; strong framing; grabs attention instantly. |
| Product Proof | 3–18 sec | Highlights features; showcases multiple angles; uses controlled lighting. |
| Context/Lifestyle | 18–27 sec | Adds environmental context; maintains consistent motion language. |
| Close/CTA | 27–30 sec | Clean brand display; minimal movement; leaves a strong final impression. |
Since about 70% of viewers watch videos without sound, ensure your visuals tell a compelling story even when muted. Adding captions can increase views by up to 40% and make viewers 80% more likely to watch the entire video.
Adjust Based on Results
If your test videos fall short of the checklist, tweak your settings to maintain quality. For issues like product morphing between shots, use fixed seed values to stabilize the visuals. If the product appears warped or "melts", reduce motion intensity to preserve its shape. Keep the Classifier-Free Guidance (CFG) scale between 4 and 7 – higher values can create unnatural textures and lighting. For lost details, opt for higher resolution and adjust variables one at a time, like just the lighting or just the hook, to understand the impact of each change.
"Speed without a QA step is fake speed. Always include a final review before publishing anything customer-facing." – AIToolsBusiness.com
Finally, test your refined videos on multiple devices to ensure consistent quality and proper audio balance. Keep background music at around 10% of the overall volume so voiceovers remain clear and easy to follow.
Conclusion
Using this five-step checklist can turn AI video production into a consistent and effective growth tool. By investing time upfront to fine-tune visuals, maintain brand consistency, organize assets, and conduct quality checks, you’ll set the stage for faster iterations and better ROI. Imagine going from creating one ad per month to testing five different hooks by the end of the week. This boost in speed and output can significantly impact your bottom line, especially since short-form video consistently delivers the highest ROI among marketing formats.
PyxelJam takes the hassle out of traditional video production by removing the need for actors, cameras, or complex logistics. Want to showcase your product in a medieval castle, underwater, or even on Mars? No problem – there’s no need for location permits or costly set designs. This flexibility, combined with quick turnaround times, allows you to experiment and adapt to the latest marketing trends – all while keeping costs far below the $15,000+ price tag typical of traditional agencies for a 30–60 second video. However, this creative freedom needs to be paired with structured production practices to ensure quality.
The key to professional, on-brand video lies in preparation. The difference between amateur content and polished, professional output often comes down to having a clear script, a consistent brand kit, and a thorough human review process. These steps ensure your product remains recognizable, your message is clear, and your audience stays engaged. Speed is only an advantage when it’s supported by a final quality check before content reaches your customers.
FAQs
What photos do I need before making AI videos?
To make effective AI videos, start by assembling clear, high-quality product photos that showcase your item from every angle – front, back, sides, close-ups, packaging, and labels. These images should capture all the essential details your audience needs to see.
Next, gather precise product information, such as the name, SKUs, dimensions, materials, and color codes (like HEX values). Don’t forget to include any fixed design elements, such as logos or label text, that must remain unchanged.
By providing these materials, you ensure the AI-generated videos maintain accuracy and reflect your brand’s quality, leaving a professional impression.
How do I stop my product from warping in AI clips?
To avoid product warping in AI-generated clips, try the 4×90 Chunking Workflow. Here’s how it works: break the full rotation into four separate 4-second clips, with each covering a 90° turn. Use the last frame of one clip as the starting frame for the next. Keep the rotation speed steady at about 22.5° per second. This helps prevent texture swimming and perspective problems, ensuring smooth and distortion-free rotations.
What export settings should I use for TikTok and Reels?
For TikTok and Reels, make sure your videos are exported in a vertical 9:16 aspect ratio with a resolution of 1080×1920 pixels (Full HD). Use the MP4 format with an H.264 codec and aim for a bitrate of 10-12 Mbps. To boost engagement, keep your videos between 11-18 seconds, though you can go up to 60 seconds for educational content. These settings help maintain high quality and prevent cropping or compression problems.
Related Blog Posts
- How to Choose the Right Video Production Company: 7 Essential Questions to Ask
- How to Achieve Consistent Style Across Multiple AI-Generated Video Clips
- How to Generate High-Quality Videos from Still Images: A Complete Guide
- Hire an AI Commercial Company: Your Step-by-Step Guide to Seamless Video Production.