People watch to solve a problem, not to hear a pitch. I’d keep product videos built around one task, one point of friction, and one result. That’s the core idea here.
I’d also keep the format tied to what the viewer wants:
- Tutorials for step-by-step in-app help
- Explainers for problem-first stories
- Customer stories for proof through outcomes
- Short social clips for one fast win
A few numbers make the point clear:
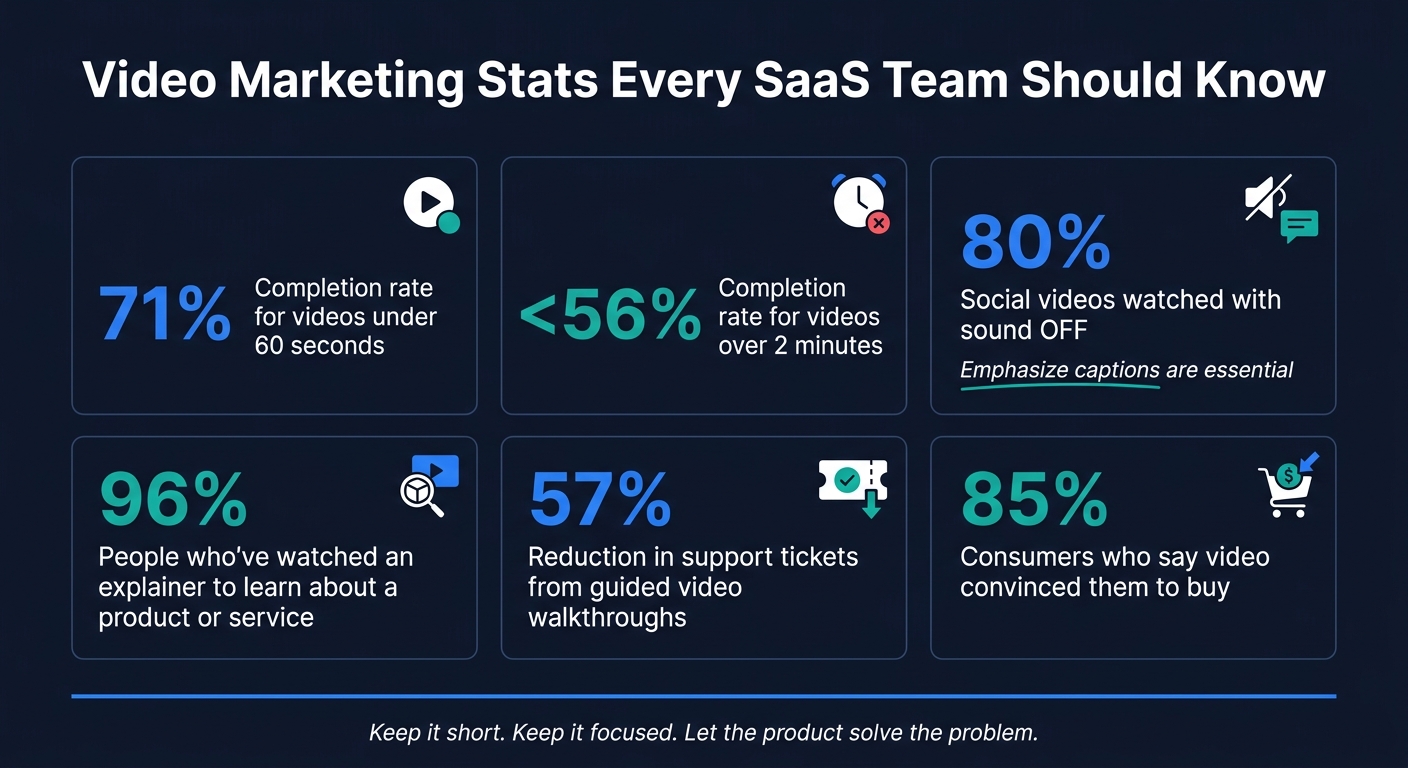
- Videos under 60 seconds can reach 71% completion
- Videos over 2 minutes can drop below 56%
- 80% of social video is watched with the sound off
- 96% of people have watched an explainer to learn about a product or service
- Guided walkthroughs have cut support tickets by up to 57%
- 85% of consumers say video has helped persuade them to buy
If I were putting this into practice, I’d do four things:
- Show a specific workflow problem
- Put the product on screen only when it fixes that problem
- Use plain voiceover, clear zooms, and short labels
- Track watch time, drop-off, replays, and sign-ups so the next cut is better
Bottom line: I’d make the product part of the fix, not the center of the story.
Video Marketing Stats Every SaaS Team Should Know
12 Best SaaS Product Demo Videos in 2026
sbb-itb-0df1f49
1. Start With One Real Workflow Problem
The fastest way to make a product feel shoved into a video is to lead with a pile of features. Start with the exact job the viewer needs to get done instead. When the product appears as the thing that helps finish that job, it feels like it belongs there. No hard sell needed.
That gives the whole video a clean path: one problem, one fix, one result.
Define the Task, the Friction Point, and the Desired Outcome
Before you write a single line of script, pin down three things: what the viewer is trying to do, where the process gets stuck, and what success looks like.
Skip broad statements like "managing projects is hard." Be specific. A friction point worth building a video around sounds more like: "spending 20 minutes every morning searching Slack for updates because nothing is centralized."
That level of detail gives you a clear setup, a clear action, and a clear payoff.
Keep Each Video Focused on One Outcome
A narrow scope makes the product integration feel natural because the viewer can track one outcome from start to finish. If you can’t explain the purpose in one sentence, the video is too broad.
Clear outcomes also make scripting and editing easier. Something like "set up your first dashboard in under 10 minutes" or "send your first client update by Friday" gives the script a finish line. Cut anything that doesn’t move the viewer toward that point.
A focused outcome keeps the product working for the story instead of fighting for attention. Keep videos under 60 seconds when possible; longer videos lose completion faster.
Once the workflow is clear, the next move is to match it with the video format that supports it best.
2. Match Product Integration to the Right Video Format
Start with viewer intent. Some people want help finishing a task. Others want to see the value fast. And some need proof before they care. That’s why the format comes first. Then you fit the product footage to that job.
Use Tutorials and Onboarding Videos to Show Real In-App Steps
Tutorials and onboarding videos should help users complete one task and get their first win fast. That’s not just a nice idea, either. Guided walkthroughs have reported up to a 57% reduction in support tickets, which shows these videos do work well beyond marketing.
So skip the broad feature tour. Go straight to a real task like account setup, creating a project, assigning a team member, or reviewing a dashboard. Show the actual UI. Move through each step at a steady pace. Give a short pause between steps so people can keep up without having to rewind every few seconds.
Use Explainers and Customer Stories to Lead With Results, Not Features
Explainers should begin with the problem, then show the payoff with short UI footage. Customer stories should do the same thing: open with the challenge, then show the result and the workflow behind it.
That order matters. 96% of people have watched an explainer video to learn more about a product or service, so this format gets attention. But it works best when the viewer feels the problem before the product shows up. Otherwise, it can feel like a demo in disguise.
What makes these videos believable? Specific outcomes. If the result is measurable, it lands harder.
Across both formats, the rule stays the same: show the result first, then bring in the product where it proves the result.
Use Short Social Clips to Highlight One Useful Moment
Short social clips are not tiny explainers. Their job is much narrower. They should spotlight one pain point or one clear win in 15 to 30 seconds.
A fast screen recording of a workflow, or a voice-led walkthrough of one feature, gives the viewer something concrete right away. And length matters more than most teams think. Videos under 60 seconds reach a 71% completion rate, while videos over 2 minutes fall below 56%. In a social clip, every second has to earn its spot.
There’s another constraint too: 80% of social video is consumed without sound. So captions aren’t optional. The value of the product needs to come through on screen, even when the viewer never taps volume.
Once the format is set, the next step is filming it so the product feels built into the story.
3. Use Production Techniques That Keep the Integration Natural
Format gets you only part of the way there. The way you film, label, and narrate product footage decides whether it feels useful or like an ad. After you pick the format, the next step is simple: make the product footage feel like a normal part of the workflow.
Show Real UI Behavior With Screen Captures, Zooms, and Overlays
Screen recordings should direct the viewer’s eye. On smaller screens, full-screen UI can feel cramped and make each step harder to track.
Use zoom to focus on the step you’re talking about – usually 1.5x to 2x on the exact interaction, then pull back when the viewer needs more context. Add cursor highlights and short annotation labels so each action is easy to follow. Those labels should describe the action, not pitch the feature. “Select team member” works. “Powerful collaboration tools” does not.
Before you record, clean up the screen. Remove badges, extensions, and bookmarks. Then use a demo account with realistic fictional data like “Acme Corp” and “$12,500”. That helps protect sensitive information and keeps the footage believable.
Once the action is easy to see, the voiceover should explain why it matters.
Write Voiceover That Explains Actions and Decisions
Don’t narrate what the viewer can already see. If someone watches a button click, they don’t need to hear, “Click the button.” What they need is the reason behind the step.
Write voiceover that explains the decision tied to each action. For example: "A manager can review pending budget requests, approve changes directly from this view, and send the updated summary to the team – all without leaving the screen." That line explains what changes in the workflow, not just what the product does.
Keep the language grounded. Skip claims like “eliminates manual work” or “automates everything.” Phrases like “reduces manual work” or “faster review process” are more believable and easier to trust.
If the workflow needs a sharper contrast, show the problem first and the improved process second.
Use Before-and-After Scenes to Make Value Clear
A before-and-after structure is one of the easiest ways to show product value without saying it outright. Start with the friction – a messy spreadsheet or scattered Slack updates – then show the same task handled through the product workflow.
That contrast does the heavy lifting. Keep the “before” scene short and specific. You only need a quick clip of the messy process to set the scene. After that, let the product footage show the cleaner path: fewer steps and faster completion.
4. Build a Repeatable Process for Scripting, Production, and Testing
Once your workflow, format, and footage are in place, turn them into a system you can use again and again. Product-led video works best when it runs like a repeatable process, not a one-off project. That matters for one simple reason: your product will change, and the video needs to keep up.
Storyboard Each Scene Around One User Action
Build each scene around one user action: trigger, action, result. That keeps the video tied to a real moment in the user’s day instead of drifting into a feature tour.
Write the script in modular blocks. That way, you can update one scene without shooting the whole video again. Each block should follow a simple pattern:
- A hook
- The main workflow
- A proof point
- A CTA
This setup makes it easier to swap scenes for different audiences or update a UI segment without re-shooting the entire video.
Review Each Video for Clarity, Accuracy, and Trust
This is the point where natural product use either holds together or falls apart. Review each scene for accuracy, trust, and fit with actual customer behavior. If a step feels staged, over-explained, or disconnected from the problem the video is supposed to solve, cut it.
A review pass with product, legal, and security teams can catch technical mistakes before they chip away at trust, especially with viewers who know your product well.
Visual trust signals matter too. Use real mouse movement, visible clicks, and UI behavior that responds like it would in an actual session. Skip perfectly timed keyframes and abstract animation when they make the footage feel fake. The goal is simple: a screen recording that looks like a person using the product, not a polished demo that feels too rehearsed.
Track Watch Time, Drop-Off Points, and Post-View Actions
Publishing is where you start getting the truth. Track watch time, drop-off points, rewatch rate, demo clicks, trial sign-ups, and help-doc visits by funnel stage.
Watch time and drop-off data show where people lose interest. In many cases, it happens during a slow transition, a loading screen, or a scene that just hangs around too long. If viewers keep replaying one UI moment, that’s a strong cue to add a zoom or a text callout in the next edit.
Post-view actions show whether the video is helping the viewer finish the right task at the right point in the funnel. If completion starts to fall, cut the video into shorter clips built around one outcome. Then use those signals to shape the next version.
Conclusion: Make the Product Part of the Solution, Not the Story
Put that process to work by treating each video as part of a real workflow. The idea is simple: your product gets attention when it fixes something, not when it tries to pitch something. When people can see the product solving a real problem on screen, the video feels useful instead of promotional.
Video can have a strong effect on buying decisions: 85% of consumers say a video has convinced them to buy a product or service.
After you publish, let the results guide the next edit. Teams that do this well treat each video like a repeatable asset and keep the story tied to one clear outcome. A modular production process helps keep every video accurate, current, and focused on that single outcome.
FAQs
How do I choose the best video format for my SaaS product?
Choose the video format based on the buyer’s stage and intent.
- Top of funnel: Use explainer videos to speak to big-picture problems and show the value you offer.
- Consideration: Use demo videos with real product screens and actual workflows, so buyers can see how the product works.
- Post-purchase: Use onboarding and tutorial videos to help people get started, drive activation, and reduce churn.
Your production style should match two things: how hard the product is to understand and how much trust the buyer needs before they say yes.
What makes product placement in video feel natural instead of promotional?
Product placement works best when it feels like a helpful tip, not a hard sell. It should fit naturally into what the viewer is already doing and show up as an actual fix for an actual problem.
Start with a problem people recognize. Then bring in the product in a clear, everyday setting where it solves a specific pain point. When the brand fits the moment and adds use, it comes across as helpful and builds trust.
Which video metrics matter most after publishing?
Put engagement and conversion metrics ahead of plain view counts. A big view number can look nice, but it doesn’t tell you much on its own.
Instead, watch completion rate. That shows whether your workflow explanations hold attention all the way through. Then look at click-through rate (CTR) on your calls to action, especially for videos placed in emails or on landing pages.
If you’re using interactive demos, track clicks inside the player too. That data shows where people lean in and what they want to try. It also helps to monitor activation and demo booking rates, since those numbers show whether the video cuts friction and moves prospects through the funnel.